Fluffy cake, billowy whipped cream, and juicy strawberries belong together, but the balance matters. This strawberry shortcake cake keeps the layers light enough to soak up the berry juices without turning soggy, and the finished slice holds its shape instead of sliding around on the plate. The result is nostalgic and clean at the same time: soft vanilla cake, cool cream, and strawberries that taste like they were just picked.
The part that makes this version work is the structure. The cakes are mixed just enough to stay tender, then cooled completely before layering so the cream doesn’t melt on contact. The strawberries get a little sugar ahead of time, which pulls out their juices and turns them glossy and spoonable instead of dry and flat. That little bit of maceration is what gives every bite extra strawberry flavor without needing jam.
Below, you’ll find the small details that keep the cream stable, the berries bright, and the layers neat. There’s also a practical note on assembling it if you’re making the cake a few hours ahead.
The strawberries softened just enough after sitting with the sugar, and the whipped cream held its shape all the way through dessert. My daughter asked if I could make it again for her birthday.
Save this strawberry shortcake cake for the kind of dessert that looks elegant but still tastes like summer berries and fresh cream.
The Trick to a Shortcake Cake That Stays Light Instead of Dense
Shortcake cake can go wrong in two directions: the crumb gets heavy from overmixing, or the layers collapse under soft filling. The fix is simple but important. Cream the butter and sugar until the mixture looks pale and fluffy, then stop mixing as soon as the flour disappears. Once the batter is overworked, the cake loses the airy texture that makes this dessert worth serving.
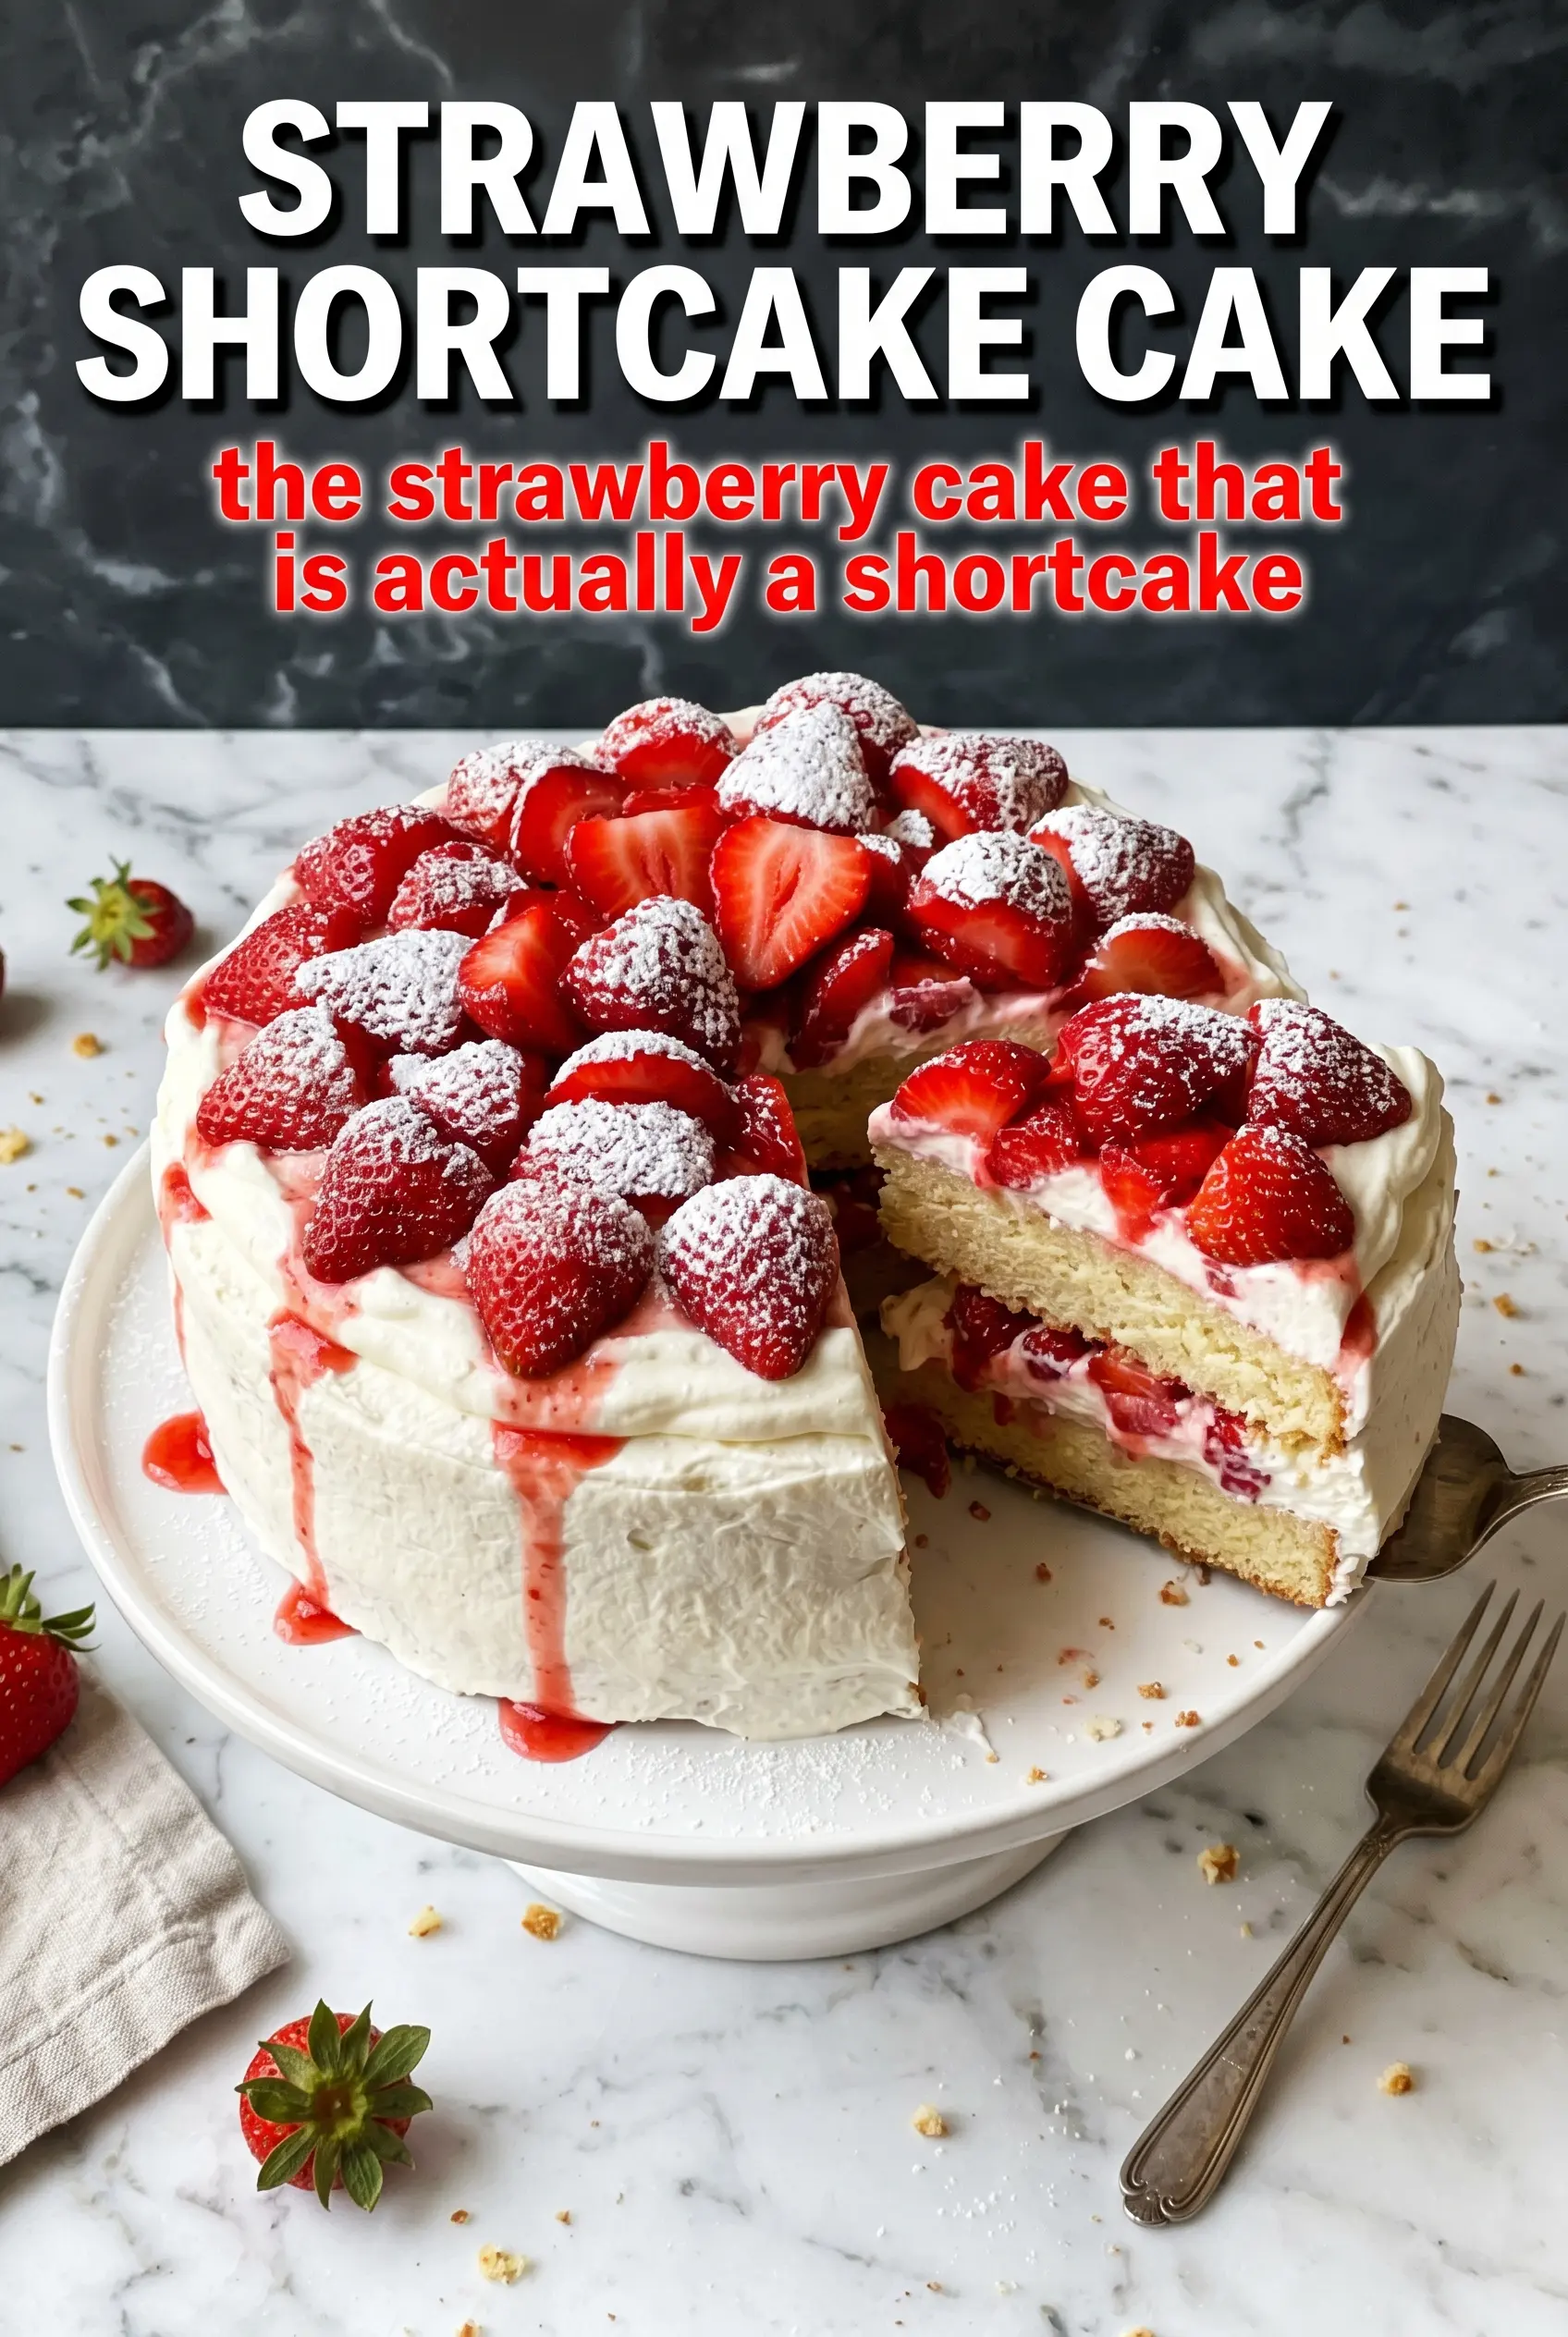
Cooling matters just as much as mixing. If the cake layers are even slightly warm, the whipped cream starts to melt and the strawberries slide around. Let the pans sit until they’re fully cool, then assemble on a plate or stand that gives you enough room to keep the layers centered. The cake tastes best when the layers stay distinct, with enough cream to soften each bite but not so much that the whole thing sags.
What the Strawberries, Cream, and Vanilla Are Each Doing Here
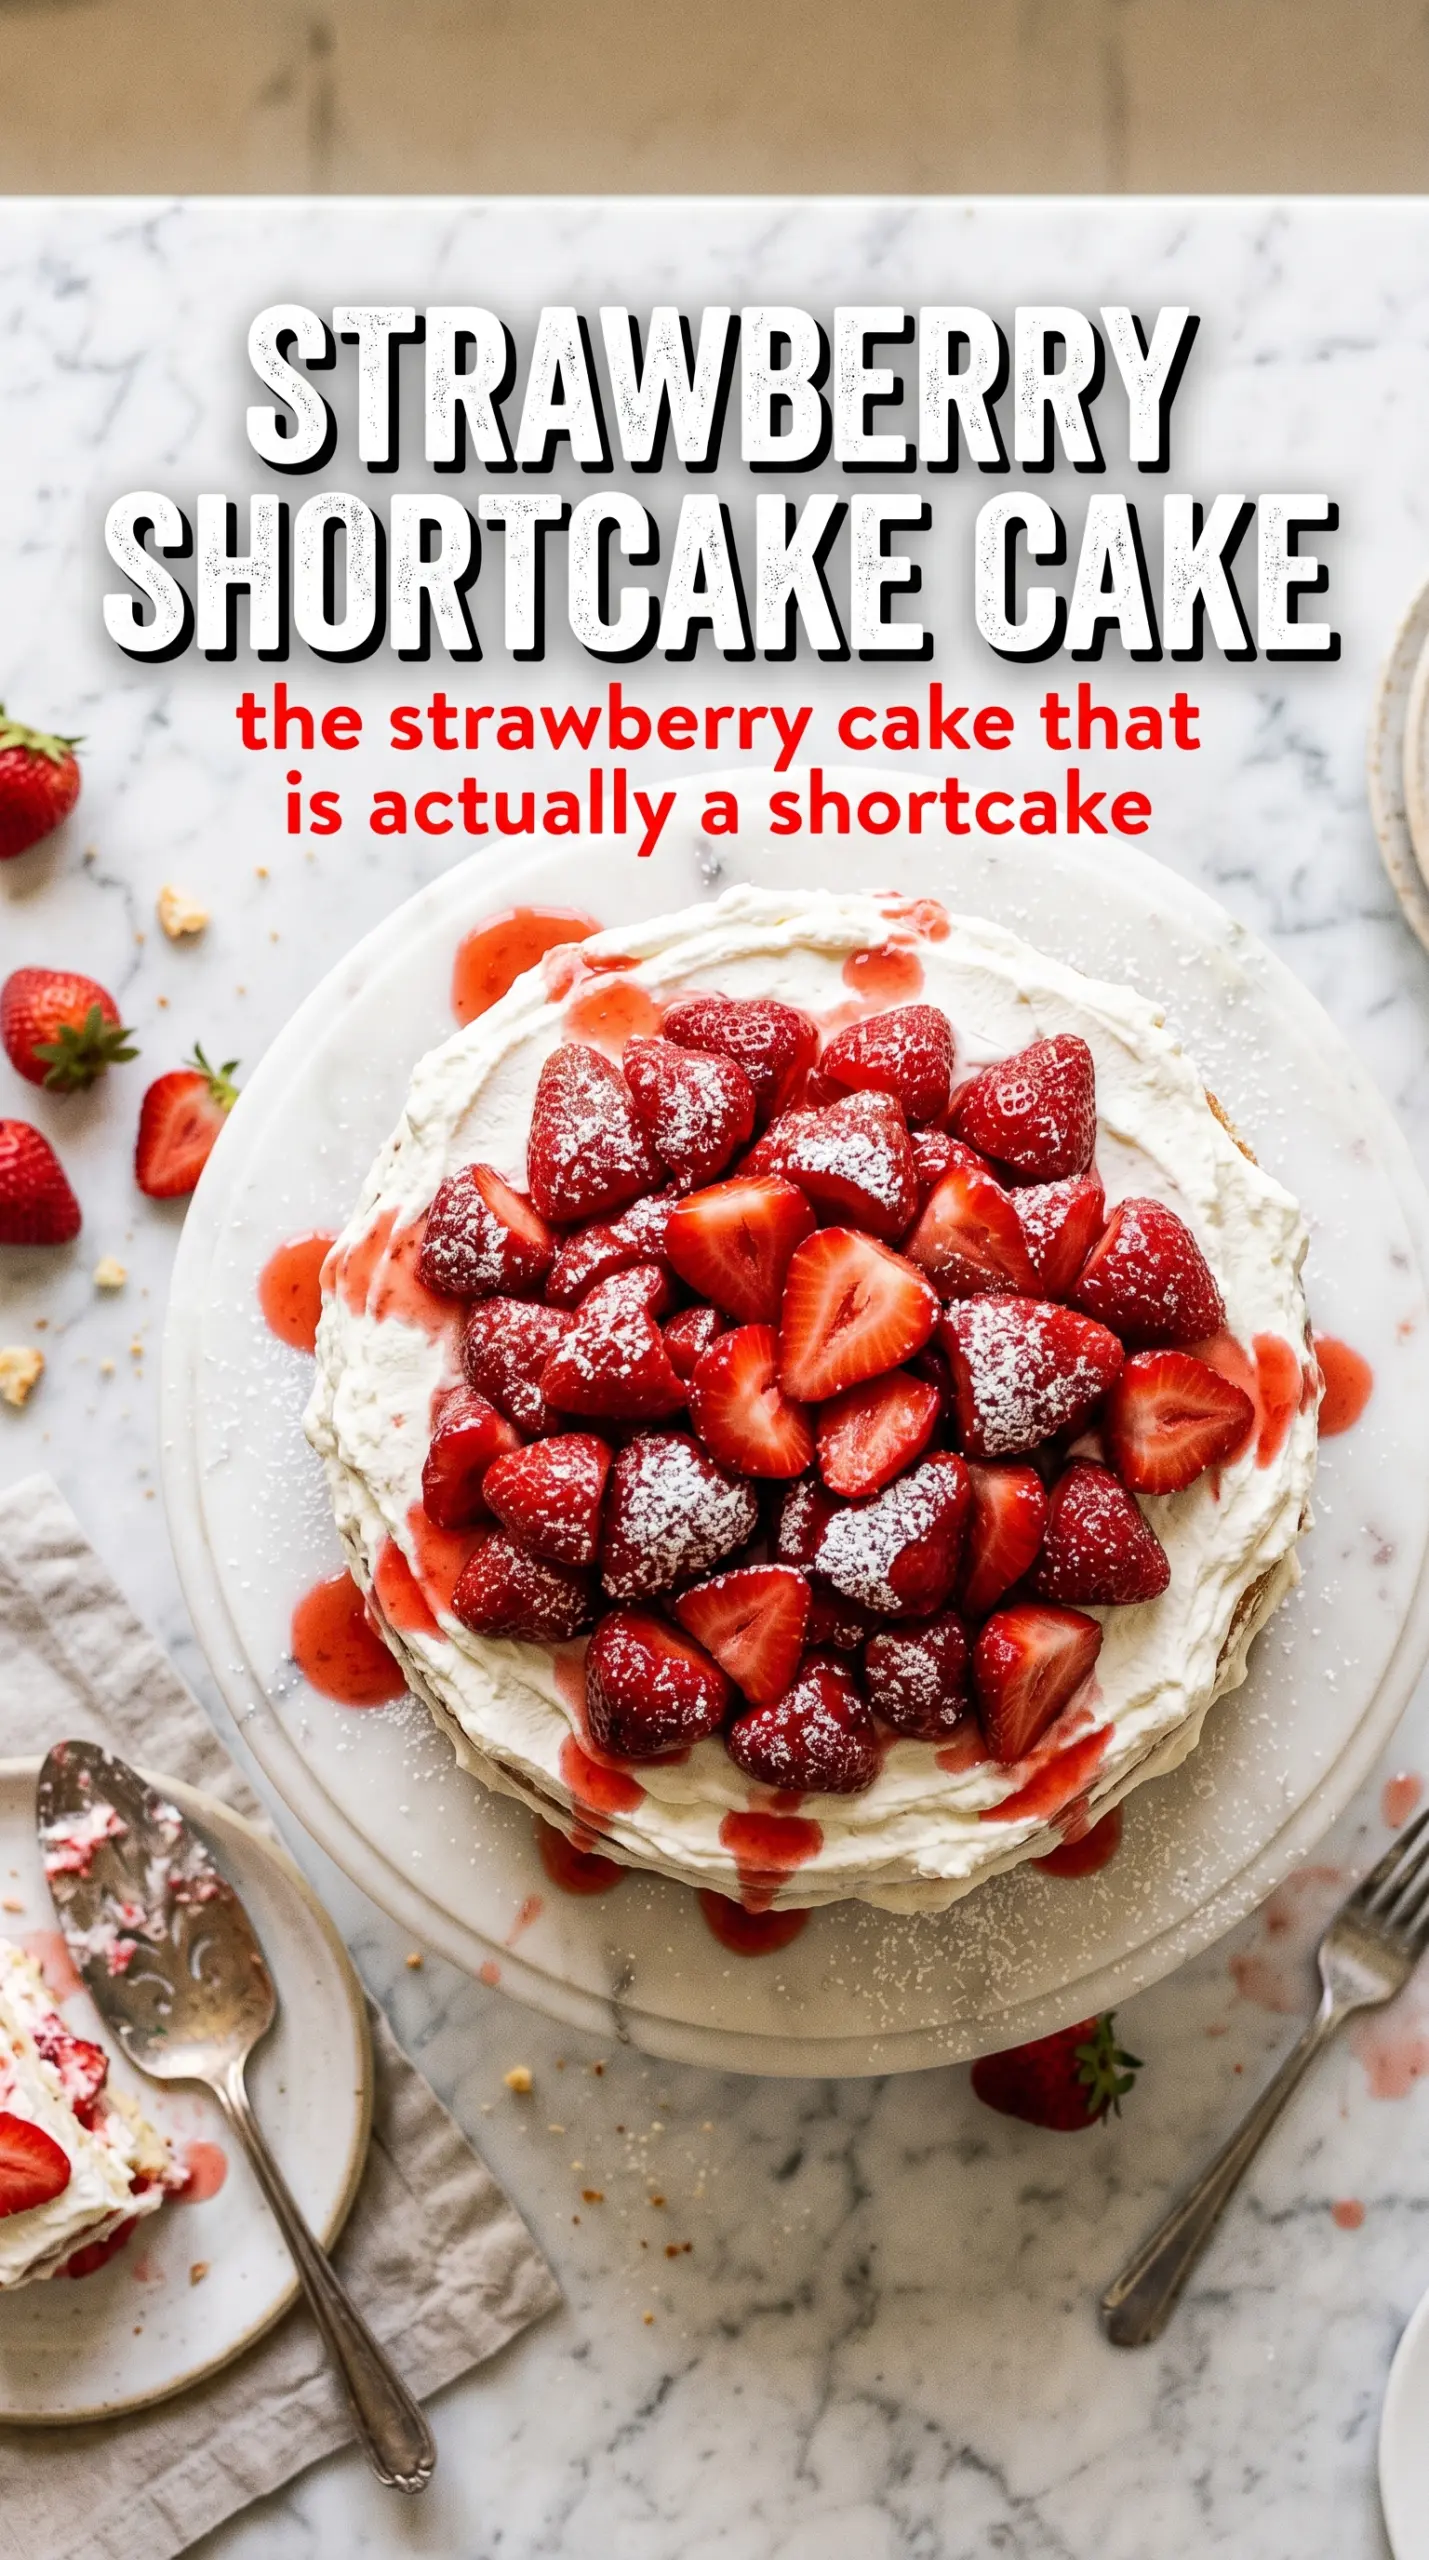
- Fresh strawberries — These carry the whole dessert. Slice them evenly so the juices release at the same rate, and let them sit with sugar long enough to look glossy and a little syrupy. If your berries are under ripe, the cake tastes flat no matter how good the cream is.
- Heavy cream — This is what gives the filling its lift and clean finish. Use cold cream straight from the fridge, then beat it only to stiff peaks so it spreads smoothly without turning grainy. If it gets overbeaten, it starts to look lumpy and loses that soft, cloudlike texture.
- Whole milk — The milk loosens the batter without making it thin. Lower-fat milk works in a pinch, but whole milk gives the crumb a richer, more tender bite. That little bit of fat helps the cake stay soft even after chilling.
- Butter — Softened butter creams properly with the sugar, which builds the structure that keeps the layers fluffy. Cold butter won’t trap enough air, and melted butter makes the cake dense. The butter should give slightly when pressed, not look greasy.
- Vanilla extract — Vanilla ties the cake and cream together and keeps the strawberry flavor from tasting one-note. Use real extract if you can, since the cake base is simple and every flavor shows up. It doesn’t need to be the loudest ingredient, just the one that rounds everything out.
Building the Layers Without Crashing the Cream
Creaming the Base
Start by beating the softened butter and sugar until the mixture turns pale and fluffy, about 2 to 3 minutes. That step isn’t about speed; it’s about trapping air so the cake bakes up light. Add the eggs one at a time so the batter stays smooth, and scrape the bowl as needed because unmixed butter likes to hide on the sides.
Adding the Dry Ingredients Without Toughening the Crumb
Alternate the flour mixture with the milk, beginning and ending with flour. That keeps the batter from breaking or turning gummy, and it helps the flour hydrate evenly. Stop mixing as soon as the batter looks combined. If you keep going, the cake turns tight instead of tender.
Baking and Cooling Cleanly
Divide the batter evenly between two greased 8-inch pans and bake until a toothpick comes out clean and the tops spring back when touched lightly. The centers should be set, not wet-looking, but don’t bake until the edges pull away dramatically or the cake will dry out. Let the layers cool completely before you touch the whipped cream. That’s the difference between neat layers and a sliding mess.
Whipping and Assembling
Beat the cream with powdered sugar until stiff peaks form, then stop. The cream should hold its shape when you lift the beaters, but still look smooth and glossy. Spread half over the first layer, spoon on half the strawberries, then top with the second layer and finish with the rest of the cream and berries. Assemble gently so the fruit stays in place instead of sinking through the frosting.
How to Adapt This Strawberry Shortcake Cake for Different Kitchens
Dairy-Free Version
Use a plant-based butter that’s meant for baking, then swap in full-fat coconut cream for the whipped topping. Chill the coconut cream until the solid part separates, then whip only the thick portion. The result is a little richer and less airy than dairy whipped cream, but it still layers beautifully.
Gluten-Free Cake
Use a 1:1 gluten-free baking flour that includes xanthan gum. The cake will still be soft, but it may need a few extra minutes in the oven and should be tested in the center, not just at the edge. Don’t swap in almond flour alone, since it won’t give you the same structure for stacking.
Make-Ahead Assembly
Bake the cake layers a day ahead and keep them wrapped at room temperature once cooled. The strawberries can be sliced and sugared a few hours ahead, but whip the cream right before assembling for the best texture. If you assemble too early, the berries start to soften the cream and the top layer loses definition.
Extra Strawberry Filling
If your berries are especially juicy, save a spoonful of the syrup from the bowl and drizzle it lightly over the first cake layer before adding cream. That gives you a stronger strawberry flavor, but don’t overdo it or the base can turn soggy. A little goes a long way here.
Storage and Reheating
- Refrigerator: Store covered for up to 2 days. The berries will soften and the cream will loosen a little, but the cake still slices well.
- Freezer: The fully assembled cake doesn’t freeze well because the whipped cream and strawberries lose their texture. Freeze the plain cake layers instead, wrapped tightly, for up to 2 months.
- Reheating: This cake isn’t meant to be reheated. Serve it cold from the fridge or let it sit at room temperature for 10 to 15 minutes so the cream softens slightly before slicing.
Questions I Get Asked About This Strawberry Shortcake Cake
Strawberry Shortcake Cake
Ingredients
Equipment
Method
- Preheat oven to 350°F and grease two 8-inch round cake pans so batter releases easily.
- Whisk together all-purpose flour, baking powder, and salt until evenly combined (dry mix with no streaks).
- Cream softened unsalted butter and granulated sugar until light and fluffy, about 2-3 minutes (mixture should look paler).
- Beat in large eggs one at a time, mixing until the batter looks smooth after each addition.
- Alternate adding flour mixture and whole milk, beginning and ending with flour, until just combined (avoid overmixing).
- Stir in vanilla extract until the batter is uniform and glossy.
- Divide batter evenly between prepared pans and bake 25-30 minutes at 350°F until a toothpick comes out clean.
- Allow cakes to cool completely before slicing or assembling (warm layers can collapse).
- Combine fresh strawberries, sliced with 1/4 cup granulated sugar and let macerate for 30 minutes until juicy.
- Beat heavy cream with powdered sugar until stiff peaks form (the cream should hold its shape).
- Place one cake layer on a serving plate and spread half of the whipped cream over it (cover evenly).
- Arrange half of the strawberries over the cream so you can see distinct red berry layers.
- Place the second cake layer on top and frost with remaining whipped cream.
- Top with remaining strawberries and garnish with additional fresh strawberries before serving to finish the look.