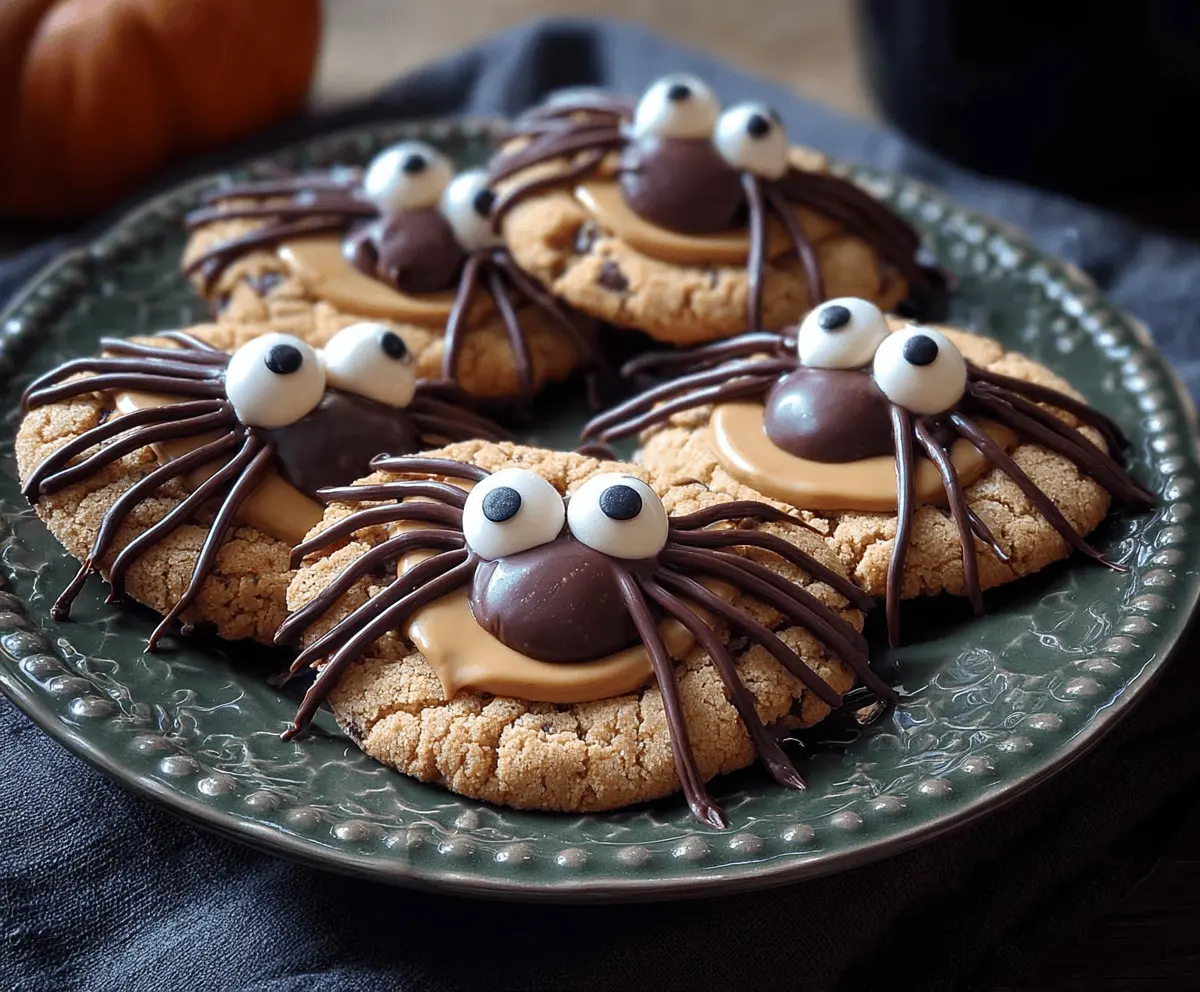
These Peanut Butter Spider Cookies are a fun twist on the classic treat! With a soft, chewy texture and rich peanut butter flavor, they’re great for any occasion.
The best part? Those chocolatey spider legs add a spooky touch, making them perfect for Halloween. I can’t resist sneaking a few before the kids get to them! 😂
Key Ingredients & Substitutions
Creamy Peanut Butter: This is the star of the show! If you’re allergic to peanuts, you can use sunflower seed butter or almond butter instead. Both will give a unique flavor!
Sugar: Granulated sugar adds sweetness and helps with the texture. You can use coconut sugar or a sugar substitute like erythritol for a lower-calorie version.
Chocolate Chips: Mini chocolate chips are optional but highly recommended! They add a delightful chocolatey surprise. If you’re dairy-free, opt for dark chocolate chips or use carob chips.
Candy Eyeballs: These give your cookies a fun spooky look! If you can’t find them, you could use chocolate chips or cut small marshmallows and place a dot of chocolate on them instead.
How to Get Your Cookies Evenly Baked?
Making cookies can sometimes lead to uneven baking. Here’s how to ensure yours come out perfectly every time:
- Make sure to roll the dough into uniform sizes for even baking.
- Using parchment paper helps with even heat distribution, keeping the bottoms from browning too quickly.
- Don’t overcrowd the baking sheet, as this can trap heat and cause uneven cooking. Leave space between each cookie.
After baking, let them cool on the sheet before transferring them to wire racks for the best texture. This will help them firm up nicely!

Peanut Butter Spider Cookies
Ingredients You’ll Need:
For the Cookie Dough:
- 1 cup creamy peanut butter
- 1 cup granulated sugar
- 1 large egg
- 1 teaspoon baking soda
- 1/2 cup mini chocolate chips (optional)
For the Spider Decoration:
- About 1 cup peanut butter or chocolate frosting for “face” base
- 1 cup semisweet chocolate chips or melting chocolate
- Candy eyeballs (about 20, 2 per cookie)
- Black decorating icing or melted chocolate for spider legs (or use piped chocolate)
How Much Time Will You Need?
This delicious recipe will take about 30 minutes of preparation and baking time, plus some extra time for decorating the cookies. It’s an enjoyable way to spend time in the kitchen, especially with little ones who love to help!
Step-by-Step Instructions:
1. Preheat and Prepare:
Start by preheating your oven to 350°F (175°C). Line a baking sheet with parchment paper to prevent sticking and make cleanup easier.
2. Mix the Dough:
In a large bowl, combine the creamy peanut butter, granulated sugar, egg, and baking soda. Mix everything together until it’s smooth and well blended. If you want a chocolatey surprise, fold in the mini chocolate chips at this stage.
3. Shape the Cookies:
Roll the dough into tablespoon-sized balls and place them on the prepared baking sheet, making sure to leave about 2 inches of space between each dough ball. Gently flatten them with your hand or a fork to help them bake evenly.
4. Bake the Cookies:
Bake the cookies in the preheated oven for 10 to 12 minutes, or until the edges turn lightly golden. Be careful not to overbake! Once done, remove them from the oven and let them cool on the baking sheet for about 5 minutes before transferring them to a wire rack to cool completely.
5. Frost the Cookie Base:
Once the cookies are cool, it’s time to create the spider’s face! Spread a small amount of peanut butter or chocolate frosting in the center of each cookie to form a nice base for the spider.
6. Melt the Chocolate:
In a microwave-safe bowl, melt the semisweet chocolate chips in 20-second intervals, stirring in between until the chocolate is smooth and creamy.
7. Form the Spider’s Body:
With a spoon or piping bag, drop a generous blob of melted chocolate on top of the frosting to create the spider’s body.
8. Add the Eyeballs:
While the melted chocolate is still soft, carefully press two candy eyeballs onto the chocolate blob to create the spider’s eyes.
9. Pipe the Spider Legs:
Using melted chocolate or black decorating icing, pipe 8 legs on each side of the spider body, extending outward to give the cookies a fun and spooky look.
10. Let Them Set:
Finally, let the chocolate and icing set completely before serving. This will help keep the design neat and delicious!
Now, your adorable and tasty Peanut Butter Spider Cookies are ready to be enjoyed! Perfect for spooky treats or any peanut butter lover in your life. Have fun!
Can I Use Natural Peanut Butter?
Yes, you can use natural peanut butter, but keep in mind it may make the cookies a little less sweet and slightly more crumbly. Just ensure the peanut butter is well mixed and oily parts are incorporated well before measuring.
How Do I Store Leftover Cookies?
Store leftover cookies in an airtight container at room temperature for up to 5 days. For longer storage, you can keep them in the fridge for about a week or freeze them for up to 3 months. Just remember to lay a layer of parchment between cookies to prevent sticking!
Can I Make These Cookies Vegan?
Absolutely! To make these cookies vegan, substitute the egg with a flaxseed egg (1 tablespoon ground flaxseed mixed with 2.5 tablespoons water, let sit until gelatinous) and use a vegan frosting. Make sure the chocolate chips are also dairy-free or dark chocolate.
Can I Customize the Decorations?
Of course! Feel free to get creative with the decorations. You could use colored icing, other candies, or even nuts for legs. Just make sure any additions stay within the theme of the fun spider design!