This Layered Greek Dip is a fun crowd-pleaser! With layers of creamy yogurt, tangy feta, and fresh veggies, it’s as colorful as it is tasty. Perfect for scooping with pita chips!
Whenever I make this dip, it disappears in minutes! It’s great for parties, or just when I want a little something special for movie night. Who can resist those flavors? 😋
Key Ingredients & Substitutions
Chickpeas: The foundation of this dip! You can use canned chickpeas for convenience, but if you prefer making them from dry, just cook until tender. A good substitute is white beans if you’re looking for a different texture.
Feta Cheese: Feta adds a tangy flavor, but if you’re looking for a dairy-free option, try crumbled tofu mixed with a bit of lemon juice and nutritional yeast. You could also use goat cheese for a different twist!
Greek Yogurt: Full-fat yogurt gives a rich creaminess, but low-fat or non-dairy yogurt works well too. Look for unsweetened coconut yogurt for a vegan option!
Cucumber: I love the crunch it gives, but feel free to swap it with bell pepper or zucchini slices, especially if you want something a bit different.
Fresh Herbs: Dill and mint add freshness, but if you’re not a fan, parsley or oregano can work too. Just use what you have on hand!
How Do You Make Sure Each Layer Stays Beautiful and Tasty?
Layering is key for presentation. First, make sure each layer is evenly spread to create visually distinct sections. Here’s how:
- Start with a smooth chickpea layer; use the back of a spoon.
- Next, gently spread hummus; don’t rush this step—it keeps the layers from mixing.
- For the yogurt, dollop small amounts around the edge and use a spatula to connect them together.
Finally, when arranging veggies like cucumbers and tomatoes, think about color and balance to make it visually appealing. Drizzle olive oil at the end to enhance flavors and shine!
Chilling the dip helps flavors blend better, so don’t skip that step. Enjoy your fresh, tasty dip with friends and family!
Layered Greek Dip
Ingredients You’ll Need:
For the Dip:
- 1 can (15 oz) chickpeas, drained and rinsed
- 1/2 cup roasted red peppers, drained and chopped
- 3/4 cup crumbled feta cheese, divided
- 1 cup hummus
- 1 cup Greek yogurt (preferably full-fat or Greek-style)
- 1 small cucumber, thinly sliced
- 1 cup cherry tomatoes, halved
- 1/4 cup kalamata olives, pitted and halved
- 2 tbsp fresh dill, chopped, plus extra for garnish
- 1 tbsp fresh mint, chopped (optional)
- 1 tbsp lemon juice
- 1 tsp garlic powder
- 1 tsp smoked paprika, plus more for garnish
- 2 tbsp olive oil, plus more for drizzling
- Salt and pepper, to taste
How Much Time Will You Need?
This delightful layered Greek dip takes about 20 minutes to prepare, plus at least 30 minutes of chilling time in the refrigerator. Total time is roughly 50 minutes, making it easy to whip up before your gathering!
Step-by-Step Instructions:
1. Prepare the Chickpea Base:
In a food processor, combine the chickpeas, roasted red peppers, 1/2 cup crumbled feta, lemon juice, garlic powder, smoked paprika, and 1 tbsp olive oil. Pulse everything together until it’s smooth and creamy. Taste and add salt and pepper as needed; this will be your flavorful chickpea base!
2. Assemble the Base Layer:
Spread the chickpea mixture evenly into the bottom of a deep serving bowl or pie dish. Make sure it’s well packed so it holds together when you serve!
3. Add the Hummus Layer:
Next, layer the hummus evenly over the chickpea base. Gently smooth it out with a spatula so it covers the chickpea layer completely.
4. Create the Herbed Yogurt Layer:
In a small bowl, mix the Greek yogurt with chopped dill, mint (if you’re using it), and a pinch of salt. Once combined, spread this herbed yogurt layer carefully over the hummus, ensuring it’s even and creamy.
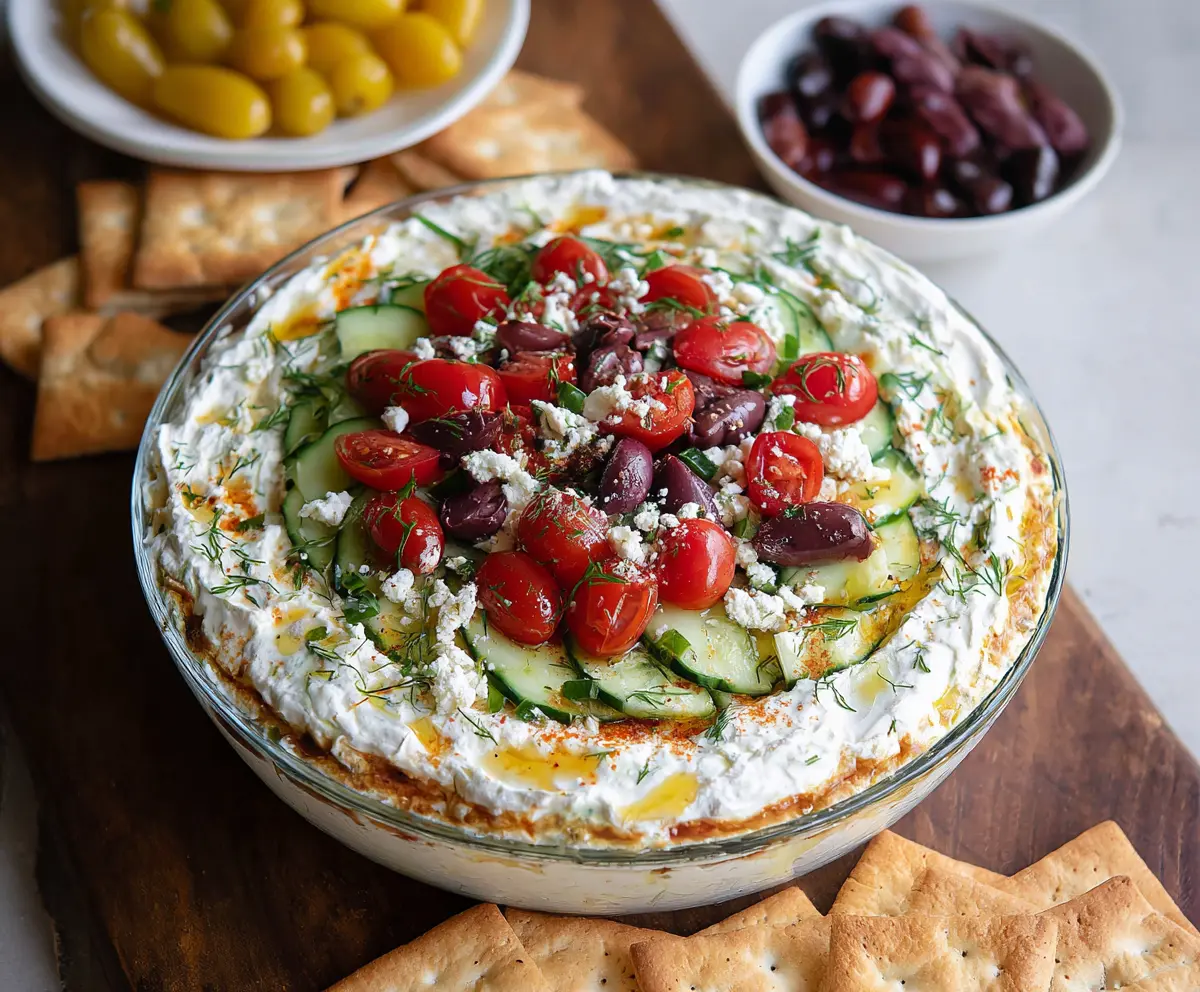
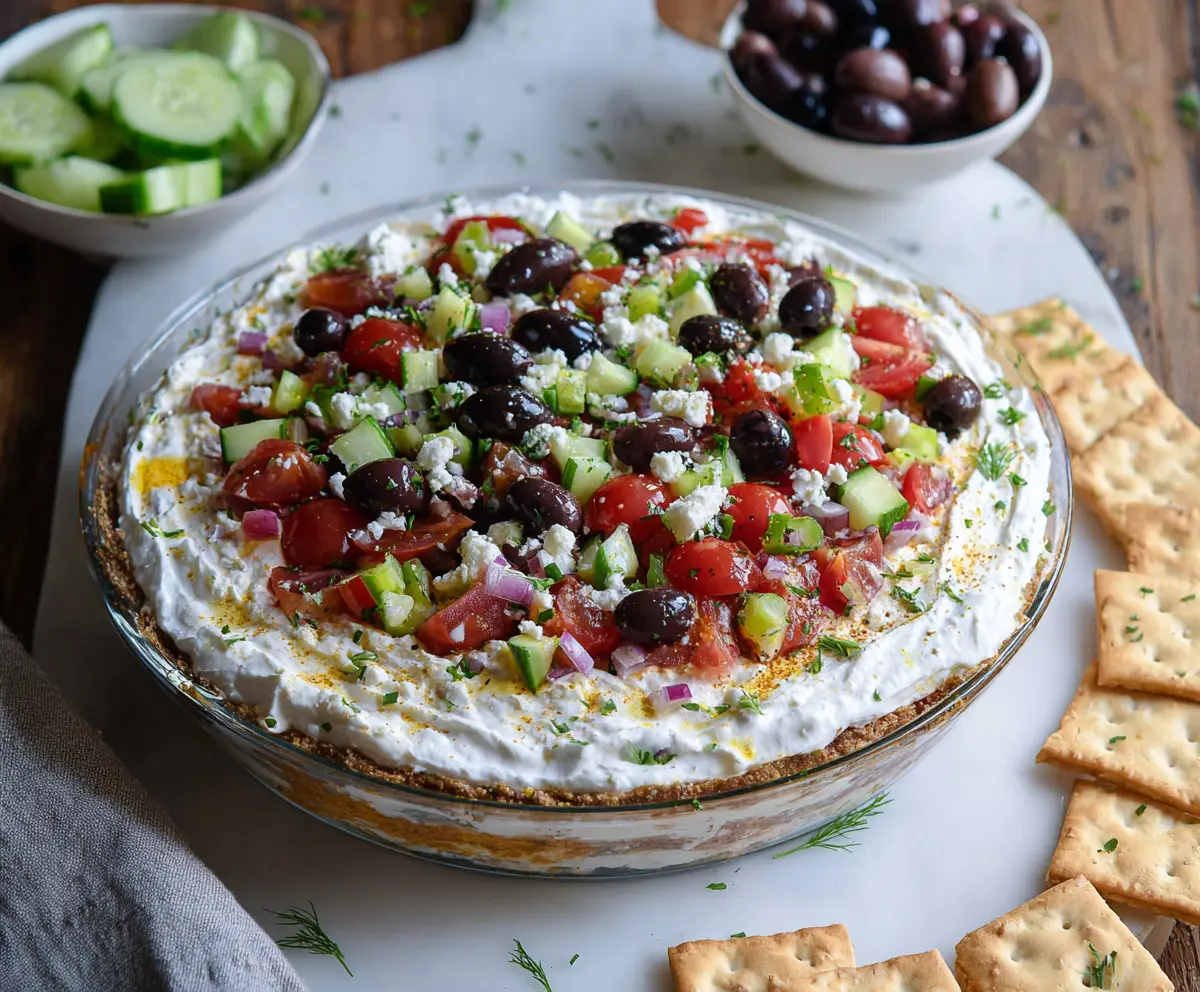
5. Layer on the Vegetables:
Now, take the thin cucumber slices and arrange them neatly in a circular pattern on top of the yogurt layer. Be creative with your design!
6. Add the Final Toppings:
Scatter the halved cherry tomatoes and kalamata olives over the cucumbers, creating a colorful topping. Then, crumble the remaining 1/4 cup of feta cheese on top.
7. Finish with Olive Oil and Spices:
Drizzle olive oil over the top of the dip and sprinkle some smoked paprika along with extra chopped dill for a beautiful garnish.
8. Chill Before Serving:
Cover the dip and place it in the refrigerator for at least 30 minutes to let all the flavors blend beautifully. Chilling also helps firm it up for serving.
9. Serve with Pita Chips or Crackers:
Once chilled, it’s time to serve! Enjoy scooping this vibrant Greek dip with pita chips or your favorite crackers. Get ready for compliments!
This Layered Greek Dip blends creamy, tangy, and fresh Mediterranean flavors for a stunning dish perfect for any occasion. You and your guests will love it!
Can I Use Store-Bought Hummus for This Recipe?
Absolutely! Using store-bought hummus can save you time without sacrificing flavor. Just make sure to choose a flavor you enjoy, as it will contribute to the overall taste of the dip.
How Can I Make This Dip Vegan?
To make this dip vegan, simply substitute the Greek yogurt and feta cheese with dairy-free alternatives, such as coconut yogurt and crumbled tofu mixed with lemon juice and herbs. You can also use cashew cream for extra creaminess!
Can I Prepare This Dip the Day Before?
Yes, you can prepare this dip a day in advance! Just layer everything and cover it tightly in the refrigerator. It’s best to add the cucumber, cherry tomatoes, and feta on the day you plan to serve to keep them fresh and maintain their texture.
What Other Vegetables Can I Add?
Feel free to customize the vegetables to your liking! Bell peppers, grated carrots, or sliced radishes work great. Just make sure to use firm vegetables that can hold up well layered atop the creamy base.